Server-side details
Public integrations
Having a public integration means that the URL that you configure is directly used as the source of the iframe. That’s the way to go for the puppy-dog videos, or anything else that needs no security. Keep in mind that the source URL must be HTTPS.
Private integrations
With a private integration, the URL that you provide is not included directly, but instead used to fetch the public URL from your service. This approach is recommended as it provides an additional layer of security, which we will discuss later. For these kinds of integrations, both afore mentioned URLs must be HTTPS.
The image below shows how the integration service fetches the public URL from your service using the private URLs
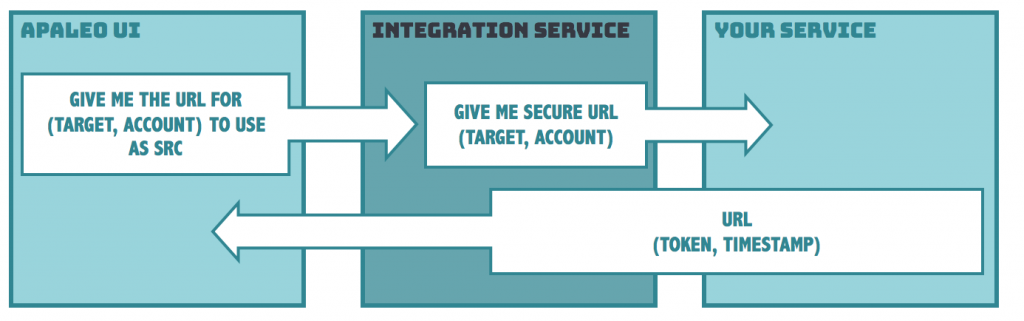
This is the format we expect as a response from your secure-URL endpoint:
{
    "url": "string",
    "expTimestamp": "datetime"
}
Be aware that datetime must be a ISO 8601 string such as ‘2019-06-06T12:55:38Z’.
The flow
Now that we have gone through the basics, let’s get to the fun part. How do I get this to work?
In order to publish your integrations, you will need to access the apaleo integration service here https://integration.apaleo.com. It provides the endpoints to set everything up, and even run tests for you, to be sure that your integration is doing what you want.
Set up integration
Setting up an integration is as easy as riding a bike on a sunny day, all you need to do is call the creation endpoint:
POST /integration/v1/ui-integrations/{target}
However, before we jump into the chapter, you might have the question “How do I make this available to customers?” lingering around your mind. The answer is simple: Because manual work is for non-lazy people, and remembering to do something is error-prone, you should plug that into the connect and setup flow. So, whenever a user connects your product to apaleo, they immediately get it in their apaleo UI. But of course, nothing stops you from adding the integration for the users from your desired customized flow and UI.
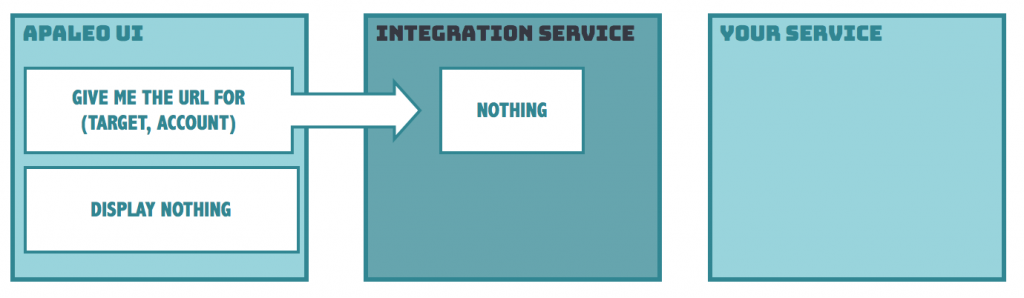
When no URL is configured for a specific apaleo account, no content will be displayed. This is what you want, but don’t forget to configure the integration every time a new connection is made. Because manual work is for non-lazy people, and remembering to do something is error-prone, you should plug that into the connect flow.
This is the payload you have to pass when creating your UI integration:
| PROPERTY | DESCRIPTION | MANDATORY |
|---|---|---|
| Code | The identifier of your integration. If no code is provided the target of the integration is used as code. | - |
| Label | The text shown in the header of your widget, for example the tab, or title of a dashboard tile. If you do not know what to use, your product name is a good choice. | Yes |
| LabelTranslations | Different language translations for your integration’s label. You only need to set iso code for the language, for instance, ‘de’ for German. Read more here. | - |
| IconSource | Nice icon to brand that part of the apaleo UI as yours. | - |
| SourceUrl | The URL of your integration. Basically, the most important part of your integration. | Yes |
| SourceType | Whether your integration is a public (SourceUrl is public) or a private (SourceUrl is private) integration. | Yes |
| Roles | The roles in the account that can see the integration. If no roles are provided, the integration is visible to every user. | - |
| PropertyIds | Property-IDs for which your integration is enabled. If no properties are provided, then the integration is available for all of them. | - |
Here is a sample payload for a private integration limited to the properties “AWE” and “SOME”:
{
  "code": "AwesomeIntegration",
  "label": " My Awesome Reservation Integration",
  "iconSource": "https://www.example.com/awesomeicon.png",
  "sourceUrl": "https://www.example.com/apaleo/reservations/integration?token=[GUID/JWT]",
  "sourceType": "Private",
  "roles": [
    "PROPERTYADMIN",
    "FRONTDESK"
  ],
  "propertyIds": [
      "AWE",
      "SOME"
  ]
}
There are certain things to keep in mind when creating or modifying your integrations.
-
For both source types
- You can have multiple integrations for the same target, as long as they have different URLs and codes.
- The separation of properties is completely optional and if no properties are provided then the integration will be available for all properties.
-
Public integrations
- When creating/modifying a public integration we validate that the provided SourceUrl is a valid HTTPS URL.
-
Private integrations
- When creating/modifying a private integration in addition of validating that it is a valid HTTPS URL, we validate and run the complete test suite. To learn more about the tests executed refer to the section Testing your integration in this guide.
⚠️ For security reasons URLs that can be resolved to IP addresses belonging to a private network (RFC-1918) are not allowed.
Set up translations
In order to set up the translations for your integration’s label, you need only to provide the
LabelTranslations field in your payload.
Keep in mind that LabelTranslations is a map, meaning it is a key and value pair collection.
Where your key is the language code, and the value is the text for your translation.
Using the previous example for a private integration. We have included the translations for the label.
{
  "code": "AwesomeIntegration",
  "label": "My Awesome Integration for Reservations",
  "labelTranslations": {
    "de": "meine fantastische Integration für Reservierungen",
    "es": "Mi Fantastica Integración para Reservaciones"
  },
  "iconSource": "https://www.example.com/awesomeicon.png",
  "sourceUrl": "https://www.example.com/apaleo/reservations/integration?token=[GUID/JWT]",
  "sourceType": "Private",
  "propertyIds": [
      "AWE",
      "SOME"
  ]
}
As you can see you simply have to add the following part to your payload:
"labelTranslations": {
    "de": "meine fantastische Integration für Reservierungen",
    "es": "Mi Fantastica Integración para Reservaciones"
  }
When updating
If you already have an existing integration, and would like to add translations, you can update it
by calling PUT /integration/v1/ui-integrations/{target}/{id} and send your updated payload. Below
is a sample.
Remember it is a PUT call. So you are updating the existing integration, so you still need to provide all the fields including the new information.
{
  "label": "My Awesome Integration for Reservations",
  "labelTranslations": {
    "de": "meine fantastische Integration für Reservierungen",
    "es": "Mi Fantastica Integración para Reservaciones",
    "fr": "Ma Fantastique Réservation Intégration"
  },
  "iconSource": "https://www.example.com/awesomeicon.png",
  "sourceUrl": "https://www.example.com/apaleo/reservations/integration?token=[GUID/JWT]",
  "sourceType": "Private",
  "propertyIds": [
      "AWE",
      "SOME"
  ]
}
Once you have set up your translations, you need to do nothing else. Our services will take care of making sure that your users see the correct language if there is a translation available.
In the case that there is not a translation set up for a specific language, then the service will use the text set for the
Labelas default. So setting it as a general representative text is always required.
Set up roles
In order to set up the roles to which your integration will be visible to, you only need to provide the Roles field in your payload.
Using the previous example for a private integration. We have included the roles.
{
  "code": "AwesomeIntegration",
  "label": "My Awesome Integration for Reservations",
  "labelTranslations": {
    "de": "meine fantastische Integration für Reservierungen",
    "es": "Mi Fantastica Integración para Reservaciones"
  },
  "iconSource": "https://www.example.com/awesomeicon.png",
  "sourceUrl": "https://www.example.com/apaleo/reservations/integration?token=[GUID/JWT]",
  "sourceType": "Private",
  "roles": [
    "PROPERTYADMIN",
    "FRONTDESK"
  ],
  "propertyIds": [
      "AWE",
      "SOME"
  ]
}
When updating
Just like with the translations above, if you already have an integration created, and would like to update the roles to which it should be visible to.
You can make a request to PUT /integration/v1/ui-integrations/{target}/{id} and send your updated payload. Below
is a sample.
Remember it is a PUT call. So you are updating the existing integration, so you still need to provide all the fields including the new information.
{
  "label": "My Awesome Integration for Reservations",
  "labelTranslations": {
    "de": "meine fantastische Integration für Reservierungen",
    "es": "Mi Fantastica Integración para Reservaciones",
    "fr": "Ma Fantastique Réservation Intégration"
  },
  "iconSource": "https://www.example.com/awesomeicon.png",
  "sourceUrl": "https://www.example.com/apaleo/reservations/integration?token=[GUID/JWT]",
  "sourceType": "Private",
  "propertyIds": [
      "AWE",
      "SOME"
  ],
  "roles": [
    "RESERVATIONMANAGER",
    "ACCOUNTANT"
  ],
}
Keep in mind that if you provide a role that does not exist or is invalid, you will get a validation error. In order to get the list of valid roles you can make a request to
GET https://identity.apaleo.com/api/v1/rolesbefore sending the request to make sure that you are sending the correct information.
Securing private integrations
When constructing the secure URL, you can go wild and implement whatever security magic you want, but it’s your responsibility to make sure that only apaleo can call your service. Not doing this may lead to intruders getting an easy way into the connected application. Here are some measures that might be helpful:
Make it so that your endpoint is only accessible from one of the apaleo public IP addresses:
(Whitelist the public IP if required)
 34.240.36.71,
 52.212.76.75,
 63.33.249.221
Attach some sort of long key / string / guid as a query parameter which is recognized by your
service https://www.example.com/integration?token=[GUID/JWT], like a JWT or reference token:
http://docs.identityserver.io/en/latest/topics/reference_tokens.html.
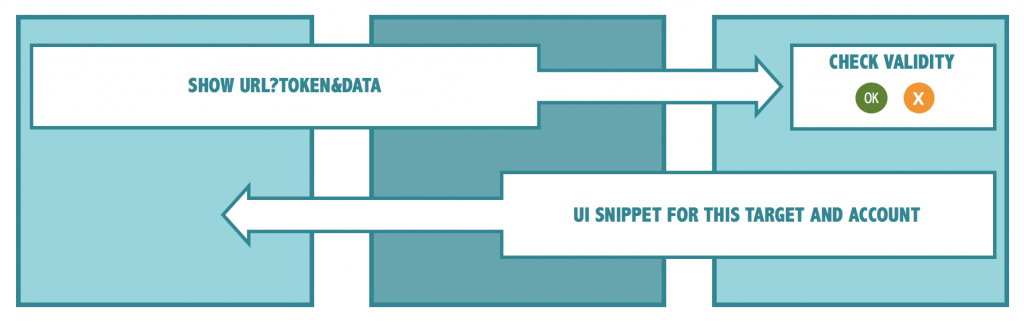
Transmitting data
When calling the final URL, apaleo appends the data to the URL, as a query parameter. Check the table of available integration targets to see which data that is.
Testing your integration
This section only applies to private integrations, public integrations are not testable.
If you make any changes on your side, you may want to make sure that our integration service can get your integration without any hiccups. That is where our nice test suite comes into play. Just call:
GET /integration/v1/ui-integrations/{target}/{id}/$test
So, what are we testing for?
- Validate that the provided private URL is valid (proper body and https)
- Make sure that the result of the response is a successful 2xx status code
- Validate that the response body is not empty
- Check that the response body fits the expected schema, as shown in the JSON code below
- Validate that the expiration date is in the future in UTC time zone
- Make sure that the received public URL is valid (proper body and https)
Sample expected response body:
{
  "url": "https://www.example.com",
  "expTimestamp": "2019-06-06T12:55:38Z"
}
Sample response for a successful test result:
{
  "success": true,
  "receivedResponse": "{'url': 'https://www.example.com', 'expTimestamp': '2019-06-06T12:55:38Z' }"
}
Sample response for a failed test result:
{
  "success": "false",
  "errorType": "HttpRequestToPrivateUrlError",
  "errorMessage": "Status code: 404",
  "errorContent": "Response from https://www.example.com was not successful (2xx)"
}