OAuth 2.0 and OpenID connect basics
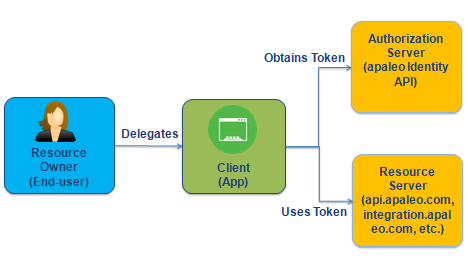
In all the OAuth 2.0 and OpenID Connect flows, there are four parties involved in the exchange:

| OAuth terms | Description |
|---|---|
| Resource owner (End-user) | An entity that owns the data and is capable of granting access to a protected resource. When a resource owner is a person, it is referred to as an end-user. |
| Client (App) | An application making protected resource requests on behalf of the resource owner and with its authorization. |
| Authorization server (apaleo Identity API) | The server issuing access tokens to the client after successfully authenticating the resource owner and obtaining authorization. |
| Resource server (apaleo Resource APIs) | The server hosting the protected resources, capable of accepting and responding to protected resource requests using access tokens. It trusts the authorization server to authenticate and authorize the OAuth client securely. |
Apaleo Identity API endpoints
| Endpoint | Description |
|---|---|
https://identity.apaleo.com/connect/authorize |
A client app may send a request to this endpoint to receive authorization to access a resource owner’s data residing on a resource server. This action initializes an OAuth flow. |
https://identity.apaleo.com/connect/token |
Post an OAuth 2.0 grant (auth code, refresh token, client credentials) to obtain access and / or ID token. |
https://identity.apaleo.com/connect/introspect |
Validate an access token and retrieve its underlying authorization (for resource servers). |
https://identity.apaleo.com/connect/revocation |
Revokes access or refresh token. This endpoint is only applicable to the authorization code grant flow. |
https://identity.apaleo.com/connect/endsession |
To use the end session endpoint, a client application will redirect the user’s browser to the end session URL. |
https://identity.apaleo.com/connect/deviceauthorization |
Can be used to request device and user codes. |
Following endpoints are provided to support OpenID Connect:
| Endpoint | Description |
|---|---|
https://identity.apaleo.com/connect/userinfo |
Retrieve profile information and other attributes for a logged-in end-user. |
https://identity.apaleo.com/connect/checksession |
Poll the OpenID provider for changes in end-user authentication status. |
https://identity.apaleo.com/.well-known/openid-configuration/jwks |
Retrieve the public server JSON Web Key (JWK) to verify the signature of issued tokens or to encrypt request objects to the server. |
https://identity.apaleo.com/.well-known/openid-configuration |
Discover the OAuth 2.0 / OpenID Connect endpoints, capabilities, supported cryptographic algorithms, and features. It can be used to configure applications. |
For more information on OAuth 2.0 endpoints, see RFC 6749 and RFC 7009.
Why use OpenID Connect for my app?
OpenID Connect is easy to integrate, and it can work with a wide variety of apps. Because OpenID Connect is a layer on top of OAuth 2.0, your app can use our APIs for both user authentication and authorization. Your app will use OAuth 2.0 flows to obtain access token plus an ID token. The id token is a JWT and contains information about the authenticated user.
OpenID Connect provides a single protocol for authentication and authorization (OAuth 2.0 access tokens).
Implementing OpenID Connect
There are many OpenID Connect certified libraries for different development platforms. You have to choose the one that suits you best. In our experience, it takes a longer time to write the code yourself than using a pre-written library.
OpenID Connect is a well-documented specification, and we recommend you consult the following resources to assist you with this process. Considering the security implications of getting the implementation right, apaleo encourages you to use a certified OpenID Connect client.
Discovery document
The discovery document (also known as “well-known endpoint”) is a set of OpenID Connect values that can be retrieved by OIDC clients. It enables OIDC clients to automatically configure themselves. The Discovery document for Apaleo’s OpenID Connect service can be retrieved from:
https://identity.apaleo.com/.well-known/openid-configuration
To use apaleo’s OpenID Connect services, you should hard-code the Discovery-document URI
(https://identity.apaleo.com/.well-known/openid-configuration) into your application. Your
application will fetch the document and retrieve endpoint URIs from it as required. For example, to
authenticate a user, your code would retrieve the authorization_endpoint metadata value
(https://identity.apaleo.com/connect/authorize) as the base URI for authentication requests that
are sent to apaleo.
You can access the discovery document page simply by entering the URL for the well-known endpoint or by using an API call to return discovery document values in JSON format.
For example, here’s a Curl command for returning the discovery document:
curl -XGET -H "Content-type: application/json" 'https://identity.apaleo.com/.well-known/openid-configuration'
Regardless of the method you choose, here’s the sort of information you’ll get back in return:
{
   "issuer":"https://identity.apaleo.com",
   "jwks_uri":"https://identity.apaleo.com/.well-known/openid-configuration/jwks",
   "authorization_endpoint":"https://identity.apaleo.com/connect/authorize",
   "token_endpoint":"https://identity.apaleo.com/connect/token",
   "userinfo_endpoint":"https://identity.apaleo.com/connect/userinfo",
   "end_session_endpoint":"https://identity.apaleo.com/connect/endsession",
   "check_session_iframe":"https://identity.apaleo.com/connect/checksession",
   "revocation_endpoint":"https://identity.apaleo.com/connect/revocation",
   "introspection_endpoint":"https://identity.apaleo.com/connect/introspect",
   "device_authorization_endpoint":"https://identity.apaleo.com/connect/deviceauthorization",
   "frontchannel_logout_supported":true,
   "frontchannel_logout_session_supported":true,
   "backchannel_logout_supported":true,
   "backchannel_logout_session_supported":true,
   "scopes_supported":[
      "openid",
      "profile",
      "transactional-data.delete",
      "reservations.import",
      ....................
      "offline_access"
   ],
      ...............
}