OAuth 2.0: Authorization code grant flow
The Authorization Code Flow is the most secure and preferred method to authenticate users via OpenID Connect. The authorization grant is defined in detail in RFC6749 sec-4.1. This grant requires the user to explicitly authenticate themselves and authorize the application initiating the grant.
From a hotel user’s view, it looks like this:
Apaleo Store
    │
    ▼
Landing page
    │   (log in & connect, or register & connect)
    ▼
Consent screen
    │
    │   Agree
    ▼
Success page — "You're connected!"
A user can also reach the consent screen directly from a “Connect to Apaleo” button placed on any page — it’s the same authorize URL, just triggered without going through a landing page first.
In this flow, protected resources that a client app requests belong to an end user (resource owner). Browsers that could expose protected resources to third parties do not receive access tokens. Instead, they receive an authorization code that on its own does not provide direct access to protected resources.
You just need to follow a two-step process in order to get a new access token.
- In the first part of the process (steps 1–4) you will send the user to the identity server to give consent to the app. Afterwards, the identity server will redirect the user back to your app using the configured redirect uri. This is where you will get your authorization code.
- In the second part of the process (steps 5 and 6) you will make a request to the identity server with your authorization code, to which it will respond with your access and refresh tokens.
1. Browser → App
   Access app

2. Browser → Identity API
   Authenticate and request authorization

3. Identity API → Browser
   Authenticate and grant authorization

4. Identity API → App
   Send a short-lived authorization code

5. App → Identity API
   Present the code to the token endpoint

6. Identity API → App
   Return access token + refresh token
- Here’s how the app uses the token to request resources (steps 7 and 8) from the resource server.
7. App → Apaleo Resource API
   Present the access token, request resource

8. Apaleo Resource API → App
   Verify the access token, return the requested resource
We will go more into detail for each step a bit later in the topic.
Scope clients vs. fine-grained clients
Apaleo supports two ways for a client app to be granted API access. You choose one as the client access type when you register the client, and it can’t be changed after the app is created:
- Scope client — the app requests account-wide API scopes (e.g.
reservations.read) in thescopeparameter, and the user grants access to the whole account for those scopes. - Fine-grained client (recommended; Fine-Grained API Access Control) — least-privilege access. At registration, you configure the exact permissions your app needs, per API, and select properties for your own developer or test account (all properties, or only selected ones), so you can build and test against real data. This isn’t what every hotel gets: when a hotel connects your app, that user is shown the properties they have access to and grants a subset of those (or “all current and future properties”) — the app doesn’t choose the properties, the connecting user does. Only a user whose Apaleo role and property access cover everything the app requests can complete the grant.
The steps, requests, and response shapes below are identical either way. The only differences — the scope value you send, what the consent screen shows, and what comes back in scope — are called out at the relevant step. To see which scope or permission an operation requires, see Scopes and permissions.
Prerequisites
Create a client app and get client credentials
After creating an Apaleo developer account, the next step to create your app is to register it at My store apps in Apaleo.
The registration process involves providing basic details of your app, like redirect URIs, and the access your app needs for the endpoints you want to access: scopes for a scope client, or permissions and properties for a fine-grained client.
Choose the client access type (scope client or fine-grained client) carefully, because it can’t be changed after the app is created. For store apps, we recommend a fine-grained client. You can edit the rest of your client’s configuration at any point in the future. After you change a client’s scopes or permissions, users have to re-authorize your app for the change to take effect. If you need a different client access type, register a new app. The registration process is not considered part of the authorization flow.
To learn how to create your client, go to Register the OAuth connect client (Apaleo store) app.
Before you start the OAuth flow, you need to prepare a few things. Here’s what you need to do.
Step 1. Get user’s consent
The purpose of this step is to obtain consent from the user to invoke the API to do certain things on behalf of the user. For a scope client, these are the scopes in the scope parameter; for a fine-grained client, they are the permissions and properties configured on your app.
This authorize URL is not something Apaleo hands you — you build it yourself, once, out of four pieces:
- the fixed endpoint,
https://identity.apaleo.com/connect/authorize - the
client_idandredirect_uriyou set when you registered your client - the
scopeyour app needs (for a fine-grained client, just the OIDC scopes — see below) - a
statevalue your app generates fresh for every request, and stores, so it can be checked when the user comes back
This is exactly what sits behind a “Connect to Apaleo” button, or the “Log in & connect” / “Register & connect” links on a landing page: your app assembles the URL below and sends the user’s browser there.
https://identity.apaleo.com/connect/authorize?response_type=code&scope=offline_access openid profile availability.read rates.read reservations.read identity:account-users.read&client_id=SDXE-AC-MYAPP&redirect_uri=https://example.apaleo.com&state=RANDOM_VALUE
The example above is for a scope client. For a fine-grained client, only the OpenID Connect scopes go in scope, because API access is configured on the app and not requested here (API scopes you send anyway are ignored):
https://identity.apaleo.com/connect/authorize?response_type=code&scope=offline_access openid profile&client_id=SDXE-AC-MYAPP&redirect_uri=https://example.apaleo.com&state=RANDOM_VALUE
Either URL performs the following things:
-
It displays a consent screen to the user with the requested access.
-
Once the user authorizes the request, they are redirected to your specified
redirect_uri.After the user accepts or denies your request, the Apaleo identity API redirects the user back to your
redirect_uri.
Calling the authorize URL opens the consent screen. When you are asked to log in, use the Apaleo credentials, not your client ID and client secret.
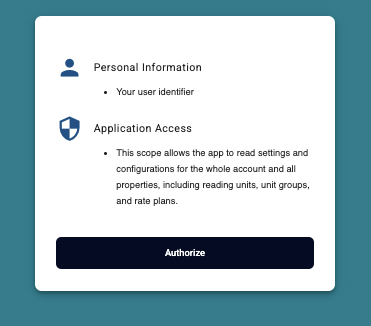
The screenshot above shows the consent screen for a scope client. For a fine-grained client, the consent screen looks like this:
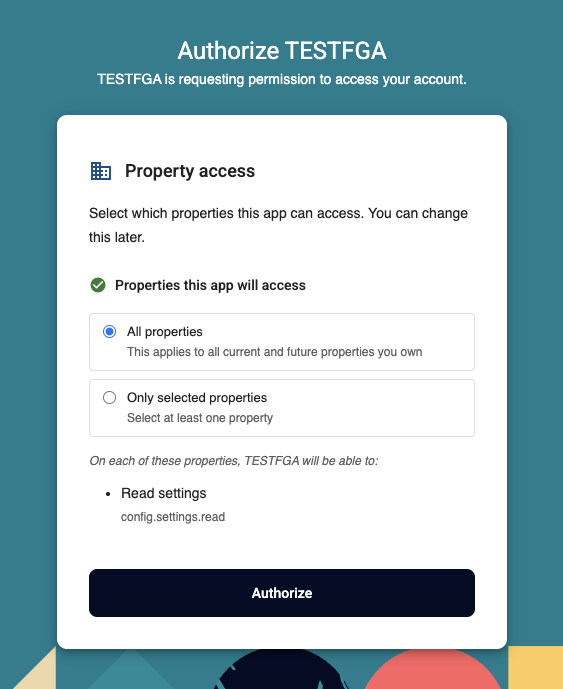
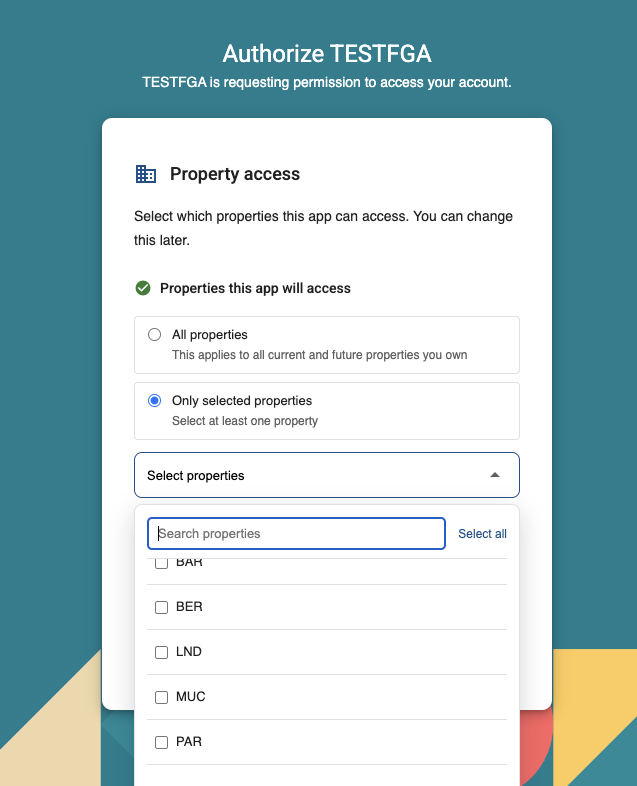
On this screen, the user sees what’s being requested and chooses whether to grant it:
- For a scope client, that’s the flat list of requested scopes, approved for the whole account.
- For a fine-grained client, the user is shown the properties they have access to and can select a subset of them (or “all current and future properties”) to grant. The screen also lists the permissions the app will have on those properties. Non-admin users can complete this step themselves, as long as their Apaleo role and property access cover everything the app requests. If it doesn’t, the connection is blocked here, and the same check runs again on every token refresh (see Refresh token grant flow).
| Key | Description |
|---|---|
| response_type | Indicates the kind of credential that Apaleo will return (code vs. token). For this flow, the value must be code. |
| scope | The scopes for which you want to request authorization, separated by a space, e.g. scope=reservations.read setup.read. For a fine-grained client, only OIDC scopes go here (openid profile offline_access) — API access is configured at registration, not requested here, and any API scopes you send are ignored. Note: if using an OpenID Connect library, the request must include the openid scope. |
| client_id | The Apaleo-generated Client ID for your connect app. |
| redirect_uri | The URL to which Apaleo will redirect the browser after the user has granted authorization. The authorization code will be included here, in the code URL parameter. It must match one of the redirect URIs you specified when registering your client app. |
| state | A randomly generated value, unique per authorization request, that your application must verify on callback. Essential for security. |
If the user approves the access request, the response contains an authorization code and the state parameter (if included in the request). The example below is for a scope client; for a fine-grained client, the redirect has no scope parameter:
https://example.apaleo.com/?code=NqSyesO......Geykw6Jc&scope=openid%20profile%20availability.read%20rates.read%20reservations.read%20identity%3Aaccount-users.read%20offline_access&state=RANDOM_VALUE&session_state=djH5mv...MS2EB23p
| Query Parameter | Value |
|---|---|
| code | An authorization code that can be exchanged for an access token. Codes are single-use only. |
| state | The value of the state parameter supplied in the request. |
| session_state | A salted cryptographic hash of Client ID, origin URL, and OpenID Provider’s browser state. |
If the user does not approve the request, the response contains an error message:
https://identity.apaleo.com/home/error?errorId=CfDJ8DA-p8Ff..........nj8
| Query Parameter | Value |
|---|---|
| error | The reason it failed, for example: “errorId”. |
Step 2. Exchange the authorization code for an access token
Now that you have an authorization code, you must exchange it for an access token that can be used to call the Apaleo API. Using the authorization code (code) from the previous step, POST to the token URL.
POST https://identity.apaleo.com/connect/token
Content-Type: application/x-www-form-urlencoded
grant_type=authorization_code&code=<my-authorization-code>&redirect_uri=<https://example.apaleo.com>
Example cURL request
curl -X POST \
  https://identity.apaleo.com/connect/token \
  -H 'Content-Type: application/x-www-form-urlencoded' \
  -d 'client_id=SDXE-AC-MYAPP&client_secret=ZiEWFgFeSP......5yhTgsZgx&grant_type=authorization_code&code=NqS......kGey6Jc&redirect_uri=https://example.apaleo.com'
| Key | Description |
|---|---|
| client_id | The Apaleo-generated Client ID for your connect app. |
| client_secret | The Apaleo-generated Client Secret for your connect app. |
| code | The authorization code received from the initial authorize call. |
| redirect_uri | Used for validation only (no actual redirection). Must exactly match the redirect_uri supplied when requesting the authorization code. |
On success, the response contains the access_token, refresh_token, id_token, expires_in, and token_type values. For example, for a scope client (a fine-grained client gets the marker scope identity:permissions plus the OpenID Connect scopes instead, for example "scope": "identity:permissions openid profile offline_access" — see the scope row below):
{
  "id_token": "eyJhbG.............aGV_EyOANg",
  "access_token": "eyJhbGciOi.....Upe6r6hHNLiNQ",
  "expires_in": 3600,
  "token_type": "Bearer",
  "refresh_token": "_A4CpoIDT.......qYEpxEW8g",
  "scope": "openid profile availability.read rates.read reservations.read identity:account-users.read offline_access"
}
| Key | Description |
|---|---|
| access_token | An access token that can be provided in subsequent calls, for example to Apaleo API services. |
| id_token | Sent as part of an OpenID Connect flow; used by the client to authenticate the user. |
| expires_in | The time period (in seconds) for which the access token is valid. |
| token_type | How the access token may be used: always Bearer. |
| refresh_token | Included if offline_access was requested and granted. Long-lived; used to get a new access_token without re-authenticating. Keep it confidential. |
| scope | A space-separated list of scopes granted for this access_token. For a fine-grained client, this contains the marker scope identity:permissions and the OpenID Connect scopes that were requested and granted (openid, profile, offline_access) — no API-area scopes, regardless of what the client is actually permitted to do. Don’t infer API access from this field; check the client’s configured permissions instead. |
Step 3. Make REST API calls
Once the access_token is obtained, it can be used to make calls to the API by passing it as a Bearer token in the Authorization header.
GET https://api.apaleo.com/inventory/v1/properties/MUC
Content-Type: application/json
Authorization: Bearer my-authentication-token
Example cURL request
curl -i -H 'Authorization: Bearer eyJ...Vsg' -X GET https://api.apaleo.com/inventory/v1/properties/MUC
The response shows the property details:
{
  "id": "MUC",
  "code": "MUC",
  "isTemplate": false,
  "name": { "en": "Hotel Munich" },
  "description": { "en": "This new cozy hotel is located in the heart of Schwabing and is walking distance from the historical city center." },
  "companyName": "Hotel München GmbH",
  "commercialRegisterEntry": "Amtsgericht München, HRB 145673183",
  "taxId": "DE311053702",
  "location": {
    "addressLine1": "Leopoldstraße 8-10",
    "postalCode": "80802",
    "city": "Munich",
    "countryCode": "DE"
  },
  "bankAccount": {
    "iban": "DE44 5001 0517 5407 3249 31",
    "bic": "SSKMDEMMXXX",
    "bank": "Stadtsparkasse München"
  },
  "paymentTerms": {
    "de": "Zahlbar bei Check In",
    "en": "Payment on check-in"
  },
  "timeZone": "Europe/Berlin",
  "currencyCode": "EUR",
  "created": "2020-04-08T21:53:26+02:00"
}
If a fine-grained client calls an endpoint for a property it hasn’t been granted access to, the API responds with 403 Forbidden — even though the same access token works for properties it does have access to. The API also responds with 403 Forbidden when the client lacks the permission the endpoint requires. See HTTP status codes and error types.