OAuth 2.0 - Client credentials grant flow
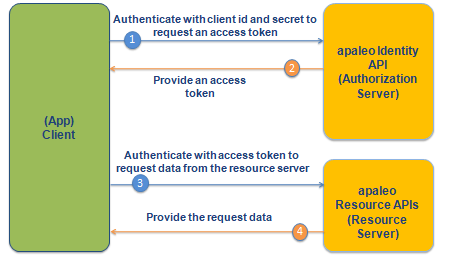
In the client credentials flow, the Authorization Server provides an access token directly to the client app after verifying the client app’s client ID and client secret. The client credentials grant type is the least secure grant type. Therefore, it is only recommended for internal client apps highly trusted by the resource server (for example, when the client app and the resource server are part of the same account (hotel organization)).
In contrast to the other OAuth flows used to obtain access tokens, this flow does not require a user login and the client does not redirect a user’s web browser to a username/password login process. The client app acts on its own behalf and assumes the role of the resource owner.
You must only use this flow if you trust the client. In other words, if the client is a computer that your hotel owns, then it will be secure and you can ensure the safety of the client credentials. Public clients can’t be trusted to identify themselves using client authentication, so that would not be a good candidate for client credentials grant flow.
The following image shows an outline of the flow:
Client credentials grant provides the following endpoint:
| HTTP Method | URI | Description |
|---|---|---|
| POST | https://identity.apaleo.com/connect/token | Token endpoint which issues access tokens. |
Why we recommend the connect clients?
Normally we recommend you to use the connect flow in order to communicate with the apaleo APIs because when you use simple clients, you would need to create new client credentials per each hotel that you want to target with your application. This means that for every hotel account that you want to integrate with your application, you would need to request new credentials following the steps below.
This is a limitation that disappears with the connect clients, as you will only need for the account admin to authorize your application, and you would get immediate access to their account. This means that you basically have access to all accounts with a single set of credentials.
Additionally, connect clients are also very simple to integrate. If you want to learn more about connect clients, go to OAuth 2.0: Authorization code flow.
However, if you are completely sure, that the simple client is the way to go for you. Just follow the following steps and you should be all set.
Step 1. Client requests an access token
Step 2. Start making REST API calls
Prerequisites
Create a client app and get client credentials
After creating the apaleo developer account, the next step of creating an app is to register the OAuth simple client (custom) app in apaleo.
The registration process involves entering basic client app details and the scopes that you require for the endpoints that you want to access.
If desired, you can edit a registered client app at any point in the future. The registration process is not considered as a part of the authorization flow
To learn how to create your client, go to Register the OAuth simple client (custom) app.
Step 1. Client requests an access token
You can obtain an access token by making a POST request to the token endpoint with required
parameters. Combine your client id and secret into a string, separated by colon, it would look
something like yourClientId:YourClientSecret and encode that string with Base64. This will
result in one long string, similar to the one you see below:
eW91ckNsaWVudElkOllvdXJDbGllbnRTZWNyZXQ=
Now that you have your client credentials in a Base64 string, it is time to request your access token. In order to do that make a request to the https://identity.apaleo.com/connect/token, endpoint.
This endpoint supports the following headers:
| Header | Description |
|---|---|
| Authorization | Required. Encode <ClientId>:<ClientSecret> with Base64 and specify it with Basic scheme. |
| Content-Type | Required. Set to application/x-www-form-urlencoded |
This endpoint supports the following parameters:
| Parameter | Description |
|---|---|
| grant_type | Required. This parameter specifies a grant type. Set to client_credentials to use Client Credentials Grant |
POST https://identity.apaleo.com/connect/token
Authorization: Basic <base64 encoded "clientId:clientSecret">
Content-Type: application/x-www-form-urlencoded
grant_type=client_credentials
Example cURL request
You can test the creation of token by running the following cURL command.
On Windows, use Windows Subsystem for Linux (WSL) to run the cURL command.
curl -X POST 'https://identity.apaleo.com/connect/token' \
  -H 'Content-Type: application/x-www-form-urlencoded' \
  -H 'Authorization: Basic U0RYRS1TNWUFQ......UZHWHZaRm1wc1labTc=' \
  -d 'grant_type=client_credentials' \
The authorization server returns a JSON-formatted response when your request succeeds. If the example request above succeeds, the server returns a response like this:
{
  "access_token": "eyJhbGci............6XUKmNJyyNRA",
  "expires_in": 3600,
  "token_type": "Bearer",
  "scope": "availability.read companies.read identity:account-users.manage identity:account-users.read offers.read reservations.manage reservations.read"
}
| Key | Description |
|---|---|
| access_token | The value of the Access Token. This is what the client will need to access the protected resource APIs. |
| expires_in | The time period (in seconds) for which the access token is valid. After this time period, the token will no longer be valid, and a new one must be retrieved. |
| token_type | Type of token. In our implementation this will always be Bearer. |
| scope | A space-separated list of scopes which have been granted for this access_token. |
The JWT looks like this:
{
  "nbf": 1591448890,
  "exp": 1591452490,
  "iss": "https://identity.apaleo.com",
  "aud": ["api", "identity_server", "notifications", "apaleo"],
  "client_id": "SDXE-SP-SIMPLEAPP",
  "account_code": "SDXE",
  "scope": [
    "availability.read",
    "companies.read",
    "offers.read",
    "reservations.manage",
    "reservations.read",
    "identity:account-users.manage",
    "identity:account-users.read"
  ]
}
The client app can make subsequent requests to the protected resource APIs until the access token received from the Authorization Server expires, in which case the process repeats.
Step 2. Start making REST API calls
Once the access_token has been obtained, it can be used to make calls to the protected resource
APIs by passing it as a Bearer Token in the Authorization header of the HTTP request.
This sample call, which shows details of a property, includes a bearer token in the
Authorization request header. This type of token lets you complete an action on behalf of a
resource owner.
GET https://api.apaleo.com/inventory/v1/properties/MUC
Content-Type: application/json
Authorization: Bearer my-authentication-token
Example cURL request
You can test your token by running the following cURL command.
On Windows, use Windows Subsystem for Linux (WSL) to run the cURL command.
curl -i -H 'Authorization: Bearer eyJhbGci............6XUKmNJyyNRA' -X GET https://api.apaleo.com/inventory/v1/properties/MUC
The response shows the property details:
{
  "id": "MUC",
  "code": "MUC",
  "isTemplate": false,
  "name": {
    "en": "Hotel Munich"
  },
  "description": {
    "en": "This new cozy hotel is located in the heart of Schwabing and is walking distance from the historical city center."
  },
  "companyName": "Hotel München GmbH",
  "commercialRegisterEntry": "Amtsgericht München, HRB 145673183",
  "taxId": "DE311053702",
  "location": {
    "addressLine1": "Leopoldstraße 8-10",
    "postalCode": "80802",
    "city": "Munich",
    "countryCode": "DE"
  },
  "bankAccount": {
    "iban": "DE44 5001 0517 5407 3249 31",
    "bic": "SSKMDEMMXXX",
    "bank": "Stadtsparkasse München"
  },
  "paymentTerms": {
    "de": "Zahlbar bei Check In",
    "en": "Payment on check-in"
  },
  "timeZone": "Europe/Berlin",
  "currencyCode": "EUR",
  "created": "2020-04-08T21:53:26+02:00"
}